Eat your Frog?! What?! I'm linking up with Jeannett at life rearranged.
Jeannett has organized a group of bloggyland peeps to journey through
Tsh’s One Bite at a Time ebook, which is a fantastic read!!! For more info, read here.
The basic idea is to do the worst thing on your plate first thing in the morning.
I literally read the first two paragraphs of Project/Chapter 1 and knew instantly
what my frog would be. On a weekday, my frog would probably be
getting ready for work -ugh!
But on a weekend, my frog would be to tackle my handylady list
(in our house, I tend to be the one who does the fix-it or install projects).
Ballard Design's Essential Panels in Spa Linen for my master bedroom.

I love them and they look like they were dyed to match our
Sherwin-Williams Austere Grey walls.
Here's the thing. I put up the first set of panels like 9 months ago
so since then, we've had one window with curtains and one without!
SOOO ridiculous, huh?!
Here's what was feeding my procrastination:
1) The curtains had to be ironed - and they're each 108" (9 ft) long!
2) The walls are 10 feet high (hence the 108" curtains) so I needed the REALLY
tall ladder from outside in the shed...which I ended up asking hubs to get for me. :)
3) I would rather color, play trains or blocks with my son than iron the curtains,
It's a "return rod" from Country Curtains (don't let that name fool you) because to me it's
quite sophisticated and not very "country."
I was first turned on to the return rod idea when I saw photos of
Ty Larkins' phenomenal home in House Beautiful.
I could just DIE for this house - the herringbone patterned wood floors
make me weak in the knees!
It's hard to believe this home is just a couple of miles away
from our home...so close but yet so far! :)
So now that you've read enough curtain rod love for a lifetime,
here's me biting the leg off of my frog (ewwwwwww) aka opening the
return rod package which was apprently put together by someone
who previously worked at Fort Knox.
...that puppy took several minutes,
scissors and even some sweat to unwrap!
Not to be confused with these puppies who were relaxing while I
struggled with the darn packaging.
(Stella on left, Indiana Jones aka Indy on right - both rescue mutts!)
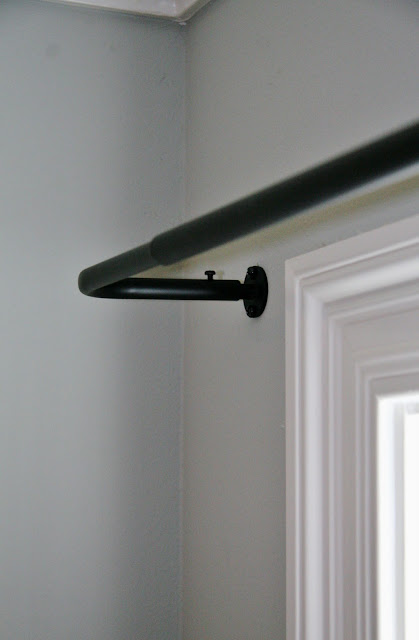
Here's the part of the curtain rod that "returns" to the wall.
To explain how the return rods are installed: the “barrel bracket” (left) is affixed to the wall and then the rod slides onto the barrel bracket and is secured with the tiny little screw.
First I measured and marked where I would drill the pilot holes for the barrel brackets.
Then I drilled the pilot holes (3/16" drill bit).
Then I tapped in the wall anchors.
Then I secured the "barrel brackets" to the wall using the screws provided.
Then I slid one side of the rod onto one of the barrel brackets – I waited to secure
the little tiny screw until after I had the curtain on the rod
and both ends of the rod on the brackets.
Here’s the finished product! They got a bit wrinkled in the process so I need to break out the steamer!
the little tiny screw until after I had the curtain on the rod
and both ends of the rod on the brackets.
Here’s the finished product! They got a bit wrinkled in the process so I need to break out the steamer!
SOOO happy this little project is finally done!
Thanks to Tsh and Jeannett for helping me eat my frog and just do it!!!
I hope to post more master bedroom projects soon – please stay tuned! :)


i have had a curtain rod laying in my floor for about 2 weeks and finally got my husband to hang it up this morning. next step is ironing the curtains and hanging them!
ReplyDeletestopped by from life rearranged. i am eating my frog too...clutter! :)
Thanks for the comment Alana! I'm a clutter bug too! Maybe I should make that my weekday frog!
ReplyDeleteIt turned out lovely. Thanks for your sweet comment on my blog :) Keep all the creativity flowing here in your blog - love them all.
ReplyDelete